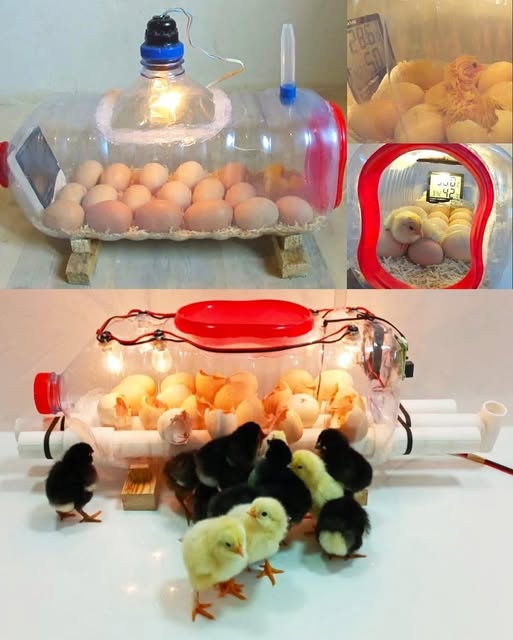
In recent years, the interest in sustainable living and self-sufficiency has surged. Many individuals are now exploring the joys of raising backyard chickens, which not only provide fresh eggs but also contribute to a more eco-friendly lifestyle. But what happens when your flock lays eggs that you want to incubate? If you’re looking for a cost-effective solution and are eager to dive deep into the art of incubation, you’re in luck! In this guide, we’ll explore how to build a homemade egg incubator using a simple water bottle. With minimal materials and a little creativity, you’ll create a functional incubator that can house your eggs and ensure they hatch into healthy chicks.
Understanding the Basics of Incubation
Before we delve into the building process, it’s essential to understand the key principles of incubation. Incubation is the process of maintaining an environment suitable for the development of a fertilized egg until it hatches. The critical factors in maintaining this environment are:
- Temperature: Most eggs require a temperature of around 99.5°F (37.5°C) during the incubation period.
- Humidity: Humidity levels should be maintained at around 40-50% for the majority of the incubation period, raising to 65-70% in the final days leading up to hatching.
- Ventilation: Proper air circulation is crucial, as embryos need oxygen and must expel carbon dioxide.
- Turning the eggs: Eggs should be turned at least three times a day (more is better) to ensure that the embryos develop properly and don’t stick to the sides of the shell.
Materials You’ll Need
Creating a homemade egg incubator using a water bottle is an ingenious way to recycle while also fulfilling a practical need. Here’s a list of materials you’ll need to gather for this project:
- Large Plastic Water Bottle (2 or 5-gallon size): This will be the main body of your incubator.
- Egg Tray or Foam: Used for egg placement, ensuring they’re secure and turning them is easy.
- Thermometer & Hygrometer: To monitor the temperature and humidity levels accurately.
- Light Bulb and Socket: A small incandescent bulb (40-60 watts) will provide heat.
- Computer Fan or Small Ventilator: For air circulation (optional but highly recommended).
- Plastic or Duct Tape: For sealing gaps and securing components.
- Small Containers of Water: Used to create humidity within the incubator.
- Thermal Insulation Material: Such as Styrofoam or bubble wrap (optional, but can improve efficiency).
- Eggs: Fertilized eggs that you wish to incubate.
Step-by-Step Instructions to Build Your Incubator
Now that you have all the materials, let’s get started on constructing your egg incubator.
Step 1: Prepare the Water Bottle
- Cut the Plastic: Start by cleaning and sanitizing the water bottle. Carefully cut the top off the bottle to create a larger opening. This opening will allow access for placing eggs and managing the internal environment.
- Create an Air Ventilation Opening: Cut small holes in the bottle on the sides opposite the opening. This will provide ventilation for your incubator and help manage humidity and temperature.
Step 2: Setting Up the Heating System
- Insert the Bulb: Secure a light bulb socket at the top of the water bottle (or where you prefer) and insert the light bulb. Make sure that it can be quickly accessed to replace or adjust it as needed.
- Electrical Setup: Ensure that the wiring is safely positioned to avoid any electrical hazards. If you are not familiar with electrical work, ask for assistance.
Step 3: Egg Placement
- Egg Tray Installation: Place an egg tray or foam at the bottom of the bottle. Ensure that the eggs can fit snugly into the tray without rolling around. You may use a small cardboard or plastic mesh tray if you can’t find one.
- Turning Mechanism: If you’d like, add a simple mechanism for turning the eggs. This could be as easy as using a stick or a hinged piece that can gently tilt the tray for turning.
Step 4: Monitoring Temperature and Humidity
- Place Thermometer and Hygrometer: Use a thermometer and hygrometer to regularly monitor the internal conditions. Secure them to the interior wall of the incubator if possible, so they come into easy view.
Step 5: Adding Water for Humidity
- Water Containers: Put small, shallow containers filled with water inside the incubator. This will help maintain the necessary humidity levels. Make sure they’re easily accessible for refills!
Step 6: Insulation (Optional)
- Insulation Material: If you want to improve temperature retention, consider wrapping the outside of the water bottle with a thermal insulation material such as Styrofoam or bubble wrap. Just ensure it does not obstruct ventilation.
Step 7: Final Checks Before Adding Eggs
- Test the Incubator: Before placing your precious eggs inside, power on the light bulb and monitor the temperature and humidity levels for 24 hours. Adjust the bulb’s height or wattage as needed to reach the ideal conditions.
Incubation Process
Now that your incubator is set up, you can add your fertilized eggs!
- Temperature and Humidity Checking: After placing the eggs, check the temperature and humidity levels. Adjust if necessary by changing the number of water containers or the light bulb’s distance from the eggs.
- Daily Monitoring: Check on the eggs regularly. Ensure that they are turned 3-5 times a day to simulate the natural process. Monitor the temperature and humidity closely over the incubation period.
- Days Before Hatching: As you near the hatching date (usually 21 days for chickens), raise the humidity to about 65-70%. This helps the chicks hatch more easily.
Successful Hatching: What to Expect
Once your eggs have incubated for about 21 days, you should start seeing some activity. The eggs may wobble, and occasional peeping sounds may be heard. On the final days, ensure the incubator stays stable, as any fluctuations could disrupt the delicate process of hatching.
Post-Hatching Care
- Prepare a Brooder: Once the chicks hatch, transfer them to a brooder filled with warmth, food, and water. Use a heat lamp to maintain a comfortable environment.
- Monitor and Care: Ensure they have adequate space, socialization, and nutritional needs met during their early days.
Conclusion: Celebrating Your DIY Incubator Journey
Building a homemade egg incubator from a water bottle is not only a creative project but also a rewarding venture into self-sufficiency. By understanding the delicate balance of temperature, humidity, and turning, you’ve created a nurturing environment for your eggs to hatch in. From the hands-on construction to watching life emerge, the entire process is one of excitement and fulfillment. Remember to document your journey, whether through journal entries, photographs, or videos, and share your experience with fellow enthusiasts. With your newfound knowledge, consider expanding your backyard chicken flock or even experimenting with incubating different types of eggs – the possibilities are endless! Happy hatching!


