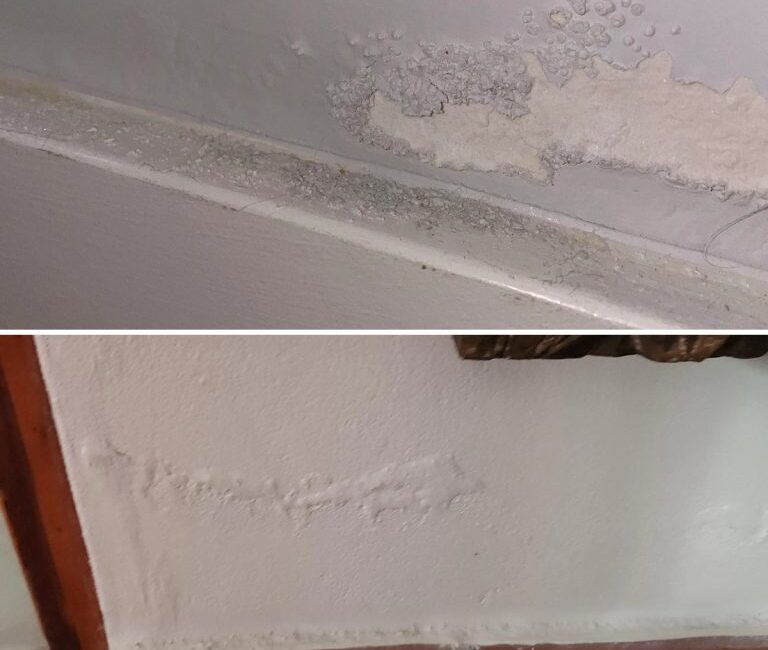
Rising damp is a common issue that affects many homes, particularly in older properties or those situated in areas with high ground moisture levels. It occurs when moisture from the ground seeps into the walls of a building, causing various problems, including peeling paint, discolored patches, and even structural damage if left untreated. For homeowners looking to manage this issue themselves, an effective DIY solution can save both time and money without the need to call a professional. In this article, we will discuss the causes of rising damp, signs to watch for, and a step-by-step guide on how to effectively eliminate rising damp and restore your walls to their former glory.
Understanding Rising Damp
Causes of Rising Damp
Rising damp primarily occurs when soil moisture rises through the capillaries in brick, stone, or mortar due to capillary action. Several factors can contribute to rising damp, including:
- Substandard DPC (Damp Proof Course): Many older buildings either do not have an effective damp-proof course or the original DPC has deteriorated over time, allowing moisture to breach walls.
- High Water Table: In areas where the water table is particularly high, or where the drainage system is ineffective, groundwater can rise and penetrate the building.
- Poor Drainage: Insufficient drainage around the building’s foundation can lead to water pooling and subsequently rising into the structure.
- Blocked Weep Holes: In brick constructions, weep holes allow drainage of moisture. If these are blocked, they can contribute to rising damp.
Signs of Rising Damp
It’s important to be able to identify the signs of rising damp early on to prevent extensive damage. Here are some common indicators:
- Damp Patches: Look for localized patches of dampness on walls, typically up to 1 meter from the ground.
- Peeling Wallpaper or Paint: The presence of peeling or bubbling wallpaper and paint is a strong indicator of rising damp.
- Mold Growth: Fungal growth or mold spots often accompany damp conditions.
- Salts on Walls: White powdery residue on the wall surfaces is likely salt efflorescence, which occurs as moisture evaporates and leaves salts behind.
- Musty Odors: The growth of mold and mildew results in odors that signal moisture issues.
If you notice any of these signs, it is essential to take immediate action to stop the dampness from worsening.
DIY Method for Eliminating Rising Damp
The following sections outline a comprehensive, step-by-step DIY method to address rising damp effectively. While this project may take some time and effort, it is achievable with the right materials and a bit of patience.
Materials Needed
Before beginning your DIY project, gather the following materials:
- Protective Gear: Gloves, safety goggles, and a mask to protect yourself from dust and debris.
- Chisel and Hammer: For removing damaged plaster and mortar.
- Wire Brush: To clean up the affected area.
- Damp Proofing Compound or Damp Proofing Membrane: For creating a barrier against moisture.
- Sealant: To fill in cracks and overall sealing after you finish your repairs.
- Plastering Supplies: Including plaster, trowels, and a mixing bucket for restoration.
- Paint or Wallpaper: For finishing touches once the restoration is complete.
Step-by-Step Process
Step 1: Assess the Damage
Before starting any work, conduct a thorough assessment of the affected walls. Identify the height of the damp patches and note any areas where the plaster is crumbling or peeling. Determine how widespread the issue is, which will guide the extent of the repairs needed.
Step 2: Prepare the Area
- Clear the Room: Move furniture or items away from the dampened area to ensure a safe working environment.
- Protect Surrounding Surfaces: Use drop cloths or old sheets to protect floors and surfaces from dust and debris.
Step 3: Remove Damaged Material
Use a chisel and hammer to carefully remove any damaged plaster and paint from the walls up to the point of dryness. This will typically be above the visible damp line. Ensure you do not cause unnecessary damage to the underlying structure.
- Tip: A wire brush can be effective in removing loose paint and debris from the wall surface.
Step 4: Treat the Affected Area
After removing the damaged plaster, clean the area with a damp cloth to remove dust. Allow the wall to dry completely.
Once dry, apply the damp-proofing compound or membrane according to the manufacturer’s instructions. This usually involves:
- Applying a Primer: Some compounds require a primer to be applied first for better adhesion.
- Rolling or Brushing on the Compound: Use a roller or brush to apply the damp-proofing material evenly onto the wall. Ensure complete coverage, paying special attention to corners and junctions.
- Allow to Dry: Follow the manufacturer’s instructions on drying time.
Step 5: Repair the Wall
Once the damp-proofing compound is dry, it is time to restore the wall.
- Mix Plaster: Follow the instructions on the packaging for mixing plaster to the right consistency.
- Apply Plaster: Using a trowel, apply a new layer of plaster over the treated area, feathering out towards the edges to ensure a smooth finish.
- Smooth Finish: Once the plaster is applied, smooth the surface with a trowel. Aim for an even finish that matches the surrounding wall.
- Drying Time: Allow the plaster to dry completely, which may take several days depending on humidity and temperature conditions.
Step 6: Final Touches
After the plaster has dried thoroughly, you can proceed to paint or wallpaper the restored area.
- Seal the Surface: Before painting, consider applying a sealant over the plaster to provide extra protection against moisture.
- Paint or Wallpaper: Choose a high-quality paint or wallpaper that is suitable for areas that may be occasionally damp. Look for moisture-resistant products to ensure longevity.
- Finishing Touches: Once the paint or wallpaper is dry, replace any decorative items that were removed for the project.
Prevention Tips
Once you have successfully eliminated rising damp, it’s essential to take preventive measures to avoid recurrence. Here are a few tips to keep your walls dry:
- Improve Drainage: Ensure that gutters, downspouts, and drainage systems are functioning effectively to direct water away from the foundation.
- Install a New DPC: If your home does not have an effective damp proof course, consider installing one to provide long-term protection against rising damp.
- Regular Inspections: Periodically check for any signs of moisture or damage in walls, especially after heavy rain.
- Ventilation: Ensure proper ventilation in the building to reduce humidity levels, using extractors or dehumidifiers where necessary.
- Landscaping: Avoid planting trees or shrubs too close to your home’s foundation, as their roots can disrupt drainage.
Conclusion
Rising damp is a manageable issue that homeowners can tackle with the right knowledge and DIY approach. By understanding the causes, identifying the signs, and following a structured method to eliminate the problem, you can restore your walls to good as new without the need for professional intervention. Remember to take preventive actions to keep your home safe from moisture and protect your investment for years to come. With patience, care, and diligence, your efforts will be rewarded with a dry and well-maintained living space.


