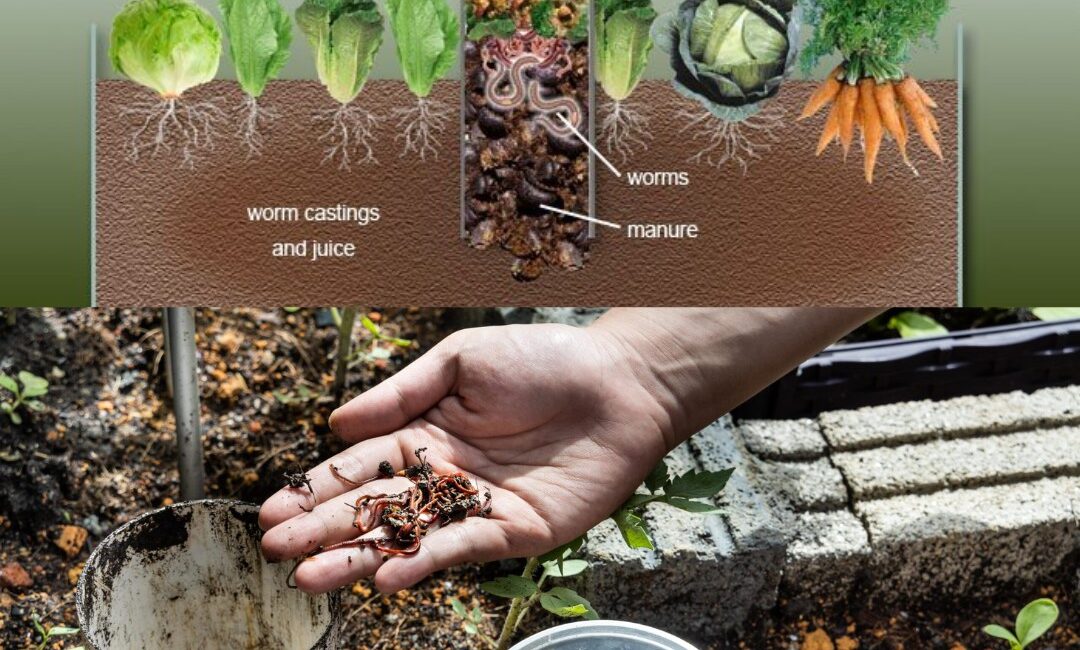
Composting is a fantastic way to turn kitchen scraps into nutrient-rich fertilizer for your garden. But what if you could take your composting game a step further and create a hidden, eco-friendly system right in your backyard? Enter the underground worm farm – a sustainable and efficient way to harness the power of nature’s decomposers: worms!
Why Go Underground?
An underground worm farm offers several advantages:
- Temperature Regulation: The ground provides natural insulation, keeping the worm environment cool in summer and warm in winter, leading to happier and more productive worms.
- Moisture Retention: Subterranean placement helps retain moisture, reducing the need for frequent watering.
- Space-Saving: No bulky bins taking up valuable space in your yard!
- Pest Control: The underground location deters unwanted critters like rodents from accessing your worm buffet.
Building Your Buried Bounty Machine: A Step-by-Step Guide
Here’s what you’ll need to create your very own underground worm farm:
- Shovel: For digging the pit.
- Bucket (optional): To temporarily hold excavated soil.
- Mesh or hardware cloth: To prevent worms from escaping and unwanted guests from entering.
- Shredded paper (newspaper, cardboard): Bedding material for your worms.
- Compost starter (optional): A small amount of mature compost to jumpstart the decomposition process.
- Red wiggler worms: These are the composting champions! You can purchase them online or at some gardening stores.
- Food scraps (vegetable peels, fruit cores, eggshells): A delicious feast for your worms.
Step 1: Choosing the Perfect Location
Select a well-drained area in your garden that receives partial shade. Avoid placing the worm farm directly under trees or near structures to prevent root damage.
Step 2: Digging the Pit
The ideal size for your underground worm farm depends on the amount of food scraps you plan to compost. A good starting point is a pit 2-3 feet deep and wide.
Step 3: Create a Worm Haven
Line the bottom and sides of the pit with hardware cloth, creating a secure enclosure for your worms.
Step 4: Bedding Basics
Fill the bottom of the pit with a layer of moistened shredded paper (about 6 inches). You can add a sprinkle of mature compost if desired.
Step 5: Welcome Your Wigglers!
Gently introduce your red wiggler worms to their new home. Aim for a density of around 1,000 worms per square foot.
Step 6: The Food Chain Begins
Start by adding a small amount of chopped food scraps on top of the bedding. As the worms devour the scraps, they’ll leave behind nutrient-rich castings (worm poop) – the ultimate prize for your garden!
Step 7: Maintaining Your Masterpiece
- Feeding: Add food scraps regularly, but avoid overfeeding. Observe how quickly the worms consume the food and adjust portions accordingly.
- Moisture: The bedding should be damp but not soggy. Add water if the bedding feels dry to the touch.
- Monitoring: Check on your worm farm occasionally to ensure there are no signs of overcrowding or moisture issues.
Reaping the Rewards of Worm Power
Within a few months, you’ll have a thriving colony of worms diligently converting your food scraps into nutrient-rich castings. Here’s how to access this black gold:
- Harvesting Castings: Unearth a section of the bedding material from the bottom or side of the worm farm. The castings will be readily visible. Carefully separate them from the bedding and return the remaining bedding and worms to the pit.
- Worm Casting Magic: Worm castings are a fantastic soil amendment. Mix them into your garden beds or potting mix to provide your plants with a slow-release source of nutrients.
Building and maintaining an underground worm farm is a rewarding and eco-friendly way to create nutrient-rich fertilizer for your garden. With a little planning and effort, you can harness the power of nature’s decomposers and create a sustainable composting system that benefits both your plants and the planet. So, grab your shovel, embrace the power of worms, and dive deep into the world of underground composting!


